The zGemma range of set-top boxes are another popular IPTV and satellite box. Popular models include Star H.2S, i55, H5.2 and many more boxes.
The first thing to do is to activate your router via our activation screen - https://www.libertyshield.com/activate If you have not activated then your router will not work. Once activated you will see a new WiFi zone being broadcast, this will start "UK-WiFi" it is always a good idea to check this connection on your PC, phone or other WiFi compatible device before connecting your zGemma box.
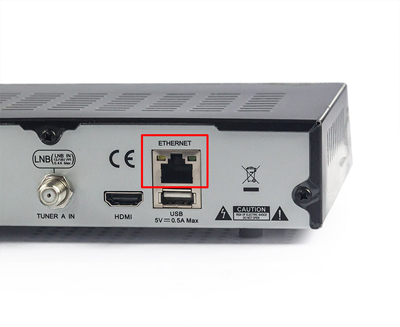
If you already have your zGemma box connected to your ISPs router all you need to do is locate the LAN cable on the back of your zGemma box, this is connected to the "Ethernet" port marked in red below and follow that to your ISPs router. Then simply unplug the LAN cable from your ISP's router and connect it directly to our router.
We have a video guide showing how this connection should look with our VPN router, your ISP's router and the zGemma box:
What you now need to do on your remote control is press - Menu, Setup, System, Network, Device Setup, then Restart Network. Once this is done please press the exit button on your remote until you are back to the main menu. From here use the "Standby/Restart" option to restart your box. This will complete the setup.
If you have any problems loading channels the most typical cause is that DHCP is not running or there is a conflict on your network. To check this please follow this video guide for step by step instructions:
If you need to disable DHCP (automatic network settings) per the video above then below are the manual network settings you will need to enter:
Primary DNS = 8.8.8.8
Secondary DNS = 8.8.4.4
*Address = 172.20.1.50
Netmask = 255.255.255.0
Gateway = 172.20.1.1
* Please note if you need to setup more than a single device manually then you will need to ensure that the IP addresses are unique (i.e. 172.20.1.50).
Greg
Comments